• Skip to primary navigation
  • Skip to main content
  • Skip to primary sidebar
  • Home
  • About Me
    • My Videos
    • Organ Meat Makeover
  • Recipes
  • Health Articles
  • Resources
    • Young Living Essential Oils

Beyond the Bite

Get Beyond the Tick Bite and Eat Right For Your Life.

  • E-books
    • Organ Meat Makeover
    • Practical Animal-Based Eating
  • About Me
    • Videos
    • Health Articles
  • Recipes
    • Email
    • Facebook
    • Instagram
    • Pinterest
    • YouTube

Recipe Index

Raspberry Electrolyte Gummy Bears (AIP, Paleo, Keto-friendly)

March 21, 2021

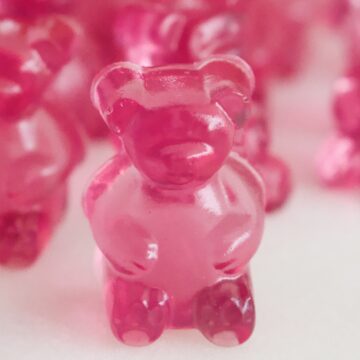
Gummy bears! What person doesn’t like them? To be honest, it’s been awhile since I’ve played around with gelatin treats. However, I’m always looking for new snacks to make for the family and figured gummies would be loved by all, big or small. While recipes typically use juice as their base, I decided I wanted to forego the fruit sugar and make a version lower in sugar but still full of fruity flavor. This is where Ultima drink mixes come in to play. In today’s recipe I used the raspberry flavor, though I’ve previously used the grape mix in the past. I’ve even made lemon gummies with a little bit of natural food die powder to make them vibrant yellow. I love to get my Ultima from Thrive Market, as you simply cannot beat the price. If you don’t have Ultima, there is a possibility that using another electrolyte powder will work. The trick when making the base is, when you think you’ve added enough flavoring, add more. While it may seem plenty tasty when dissolving the gelatin and flavoring into the water, once the liquid sets, the flavor mellows out a bit. For this reason, you want it to be very concentrate before pouring into the molds. I like to keep my gummies in the fridge in a covered container and simply remove them 10-15 minutes before eating. This keeps them fresh and stops them from sticking to eachother too much. Overall, this recipe is an easy way to get kids in the kitchen and have a little fun creating a gut-friendly snack.

Raspberry Electrolyte Gummy Bears

Ingredients

  • 1 cup water
  • 3 scoops Ultima electrolyte powder
  • 3 tbsp gelatin

Process

  • In a small pot over medium heat, gently dissolve gelatin and electrolyte powder in the water until thoroughly combined.
  • Use a dropper to transfer the liquid into your gummy molds and allow to cool 2-4 hours before removing from the molds.

Jeremiah 17:7 ““But blessed is the one who trusts in the Lord, whose confidence is in him.”

Filed Under: AIP, candy, gluten free, grain free, ketogenic, no bake, nut free, Recipes, Sweets and Snacks

AIP-Paleo Scallion Pork Stir-fry (Keto-friendly)

March 13, 2021

These days, I’m lucky to find any uninterrupted time in the kitchen. New recipes usually come on the fly and stem from a need to feed my family something different from the same old-same old. With all of the delicious aromatics used in Asian cuisine, I’ve always leaned more towards these recipe types when concocting a new dish. Not only does sauteed garlic, onion, and ginger make the end dish taste amazing, smelling it as it cooks is equally as amazing. As far as today’s recipe goes, if you don’t have ground pork, feel free to use any ground meat that you have on hand. I recommend them all except, maybe, ground lamb. The recipe can also be simplified using dried aromatics, such as ground ginger, onion, and garlic. However, the end result may not be quite as rich in flavor. I chose to serve our pork with a side of rice for the husband and kiddos, as well as some steamed broccoli and radish for myself. Overall, this recipe can easily be prepped beforehand and quickly thrown in a skillet before mealtime, making it a great meal for any busy individual like myself.

Scallion Pork Stir-fry

Ingredients

  • 1 lb ground pork
  • 1 inch fresh ginger
  • 3 garlic cloves
  • 1 cup sliced scallions
  • 1/2 large yellow onion, sliced
  • 1/2 tsp fish sauce
  • 1/2 cup coconut aminos
  • 1 tbsp maple syrup (optional)
  • Avocado oil

Process

  • Finely mince garlic and ginger, slice scallions on a bias, and onion into 1/4 inch slices
  • Heat avocado oil in a skillet on medium-low and then add scallions and onion, sauteing until just turning translucent, then add in garlic and ginger, sauteing until fragrant.
  • Add in ground pork and sautee until just beginning to cook through, then add in fish sauce, coconut aminos, and maple syrup.
  • Turn the heat up to medium and continue to cook until the sauce has reduced slightly and the pork is cooked through.
  • Serve with cauliflower rice or your choice of vegetables.

Deuteronomy 7:9 “Know therefore that the Lord your God is God; he is the faithful God, keeping his covenant of love to a thousand generations of those who love him and keep his commandments.”

Filed Under: AIP, autoimmune friendly, autoimmune paleo, grain free, ketogenic, low carb, meat, nut free, paleo, pork, Protein Dishes, Recipes

Chocolate Chip Collagen Protein Bites (Paleo, Keto, Low-carb)

February 21, 2021

While I’ve made a variety of baked goods with a splash of collagen here and there, never has a recipe stuck like today’s. This recipe has easily become my favorite to keep stashed in the freezer and cut into little pieces to dish out to my toddler whenever she is asking for a snack. They’ve become so common in our house that she frequently visits the fridge, pulls at the freezer door, and exclaims “please, please!” (which sounds more like peas at this point – lol). I’ve made a few different varieties, some with 1/3 cup of cocoa added for a brownie bar, as well as with tigernut in place of the almond flour. Regardless of these changes, they come out equally as delicious each time. I keep them in the freezer, not just because it makes them last longer, but also because they are naturally super dense and fudge-like. The high fat and collagen content make them nice and chewy, and I’ve found storing them below fridge temperature makes their texture exceptional. I choose to use Thrive Market’s collagen, not just because of its affordable price, but because it comes in a 20 oz pouch that lasts for quite a few rounds of these bars. I also use Lily’s chocolate chips to keep these yummy morsels low in sugars and rich in protein and fat. Overall, these collagen bites are not only super easy to make, they’re a great power-house snack for on-the-go adults or growing toddlers who seem to always be hungry.

Chocolate Chip Collagen Protein Bars

Ingredients

  • 1 cup Thrive collagen
  • 1 cup almond flour
  • 1/2 tsp sea salt
  • 1/3 cup stevia syrup
  • 1 tsp vanilla
  • 4 oz butter, melted
  • 2 eggs
  • 1/2 cup Lily’s chocolate chips

Process

  • Whisk together the dry ingredients in a bowl.
  • Crack eggs in the bowl one at a time, then add melted butter, stevia, and vanilla.
  • Stir until everything is evenly incorporated, then fold in the chocolate chips
  • Pour batter into a parchment lined 8×8 baking dish and bake for 20 minutes at 350 dg until golden on the top.

Notes

Substitute maple syrup for stevia and tigernut flour for almond flour.

1 Chronicles 16:11 “Look to the LORD and his strength; seek his face always.”

Filed Under: coconut free, gluten free, grain free, ketogenic, low carb, paleo, Recipes, Sweets and Snacks, tigernut flour

Chronic Lyme & Home Birth (Pt. 1)

February 10, 2021

Our little boy came to us just after 1 o’clock on November 19th.  The days leading up to his birth were just like any other.  I was busy preparing for Fall finals and everything else that comes with being a full-time student and mother.  That being said, this pregnancy was much different than the last.  I felt much better with my chronic Lyme and saw a great reduction in my inflammation and allergies.  I also felt minimal morning sickness, allowing me to workout through the entire duration of my pregnancy.  My cravings were slim to none, and it was as if my body knew what it was doing this second time around.  While my first was born a c-section due to being in a breeched position, I chose to go the route of a midwife and doula this time around.  Though our boy did a lot of flip-flopping around, he remained head down and I was able to proceed with a plans for a home-birth (hallelujah!).

As I was saying, the weeks and days leading up to labor weren’t anything out of the ordinary.  Our little guy’s projected “due date” was November 26th, however, around the 11th I started experiencing Braxton Hicks contractions every afternoon for a few hours.  They would come and go but eventually die out around bed time and I was able to sleep peacefully.  After about a week of experiencing these I realized one afternoon that they were, in fact, not going away. Picking up the kids legos got suddenly much more difficult and the contractions continued all night, slowly getting stronger and stronger with each hour.   I chose to remain in denial of their significance, as I didn’t want to work myself up over something I knew would not be the worst of the pain I would feel. On top of that, I was supposed to drive to campus and complete an anatomy exam first thing in the morning (yeah right).  The joke was definitely on me.  By 5 AM I was tired of lying in bed and timing my contractions so I got up and spent some time on my bosu ball.  By 6:30, Allie had woken up and we decided to get on with our day just like any other.  Reluctantly, I emailed my professor while my husband cooked off a big breakfast of eggs and bacon.  I ate the food as quickly as I could between contractions, soon realizing just how strong they were getting.  I went to the shower to try and ease some of the pain and my husband, being the super man that he is, quickly got the birth pool and supplies ready.  To be honest, due to planning on our boy being born a week later (and me being distracted by school), we were a little ill-prepared for his arrival.  Don’t get me wrong, we had *mostly* everything for the home-birth, it was just wasn’t prepped and ready (like oh, I don’t know, the faucet-hose converter to fill up the birth tub – oops). Everything turned into what seemed like a whirlwind real fast. I called my doula inbetween contractions to update her on my progress and within a hour, the entire birth team had showed up. Thankfully, we found a way around the hose converter and after continuing in active labor for about 4 hours, our little boy John Miguel was born.

My Experience

Overall, giving birth at home was a magical experience (all pain aside). While there were moments that I truly wasn’t sure how I would keep going from the exhaustion, I wouldn’t have chosen any other way. In the moments of weakness I sought strength from my husband and birth team. I knew God would help me finish the task at hand, I just needed to stay mentally strong so my body would follow. While everyone’s preferences are different, I chose to labor without music or extra noise (aside from the HEPA filter in our bedroom). Noise annoyed me and I didn’t like being distracted mentally. On the other hand, I did enjoy being able to move around while in labor. My team (husband included) was great about pushing my limits and making me change positions (sitting, lying down, in the birthpool, etc…). I can’t imagine laboring any other way! It was also really nice physically to give birth in a warm birth pool, and John definitely benefited as well. He was so chill once emerging from the water and cuddled up on my chest right away. On top of this, we got to do delayed chord clamping to give John all the goods from my placenta. I am so thankful!

Testing

In regards to my chronic Lyme this time around, I chose not to do placenta testing through Igenex (see post here on my 1st). There was no specific reason except for my first test was negative and with this pregnancy I felt even better than I did with our daughter.  I’m all about going based off of your gut feeling, and my gut feeling this time around was that it just wasn’t necessary. So far, our boy has been perfectly healthy aside from some low-level, breastmilk jaundice that has slowly cleared up on its own. Similar to Allie, John had a tongue tie, as well as very predominant cheek ties and a lip tie. We chose to get these revised through laser treatment, as they were inhibiting proper growth of his jaw and were causing his latch to be weak. Overall, he has recovered well from this procedure and the proceeding weeks of stretches/exercises, causing nursing to be much easier. In fact, as of now, he is gaining almost 1/2 of an oz a week!

Postpartum

As for myself, this postpartum experience has definitely been different than my first as well.  My hormones seem to be much more balanced, and while I’ve had plenty of the new-mom emotions, things are much less of a rollercoaster.  My allergies have also been kept somewhat in-check, likely due to my hormones being more balanced (and thus less histamine release).  I’m crossing my fingers things stay this week now that we are about 2.5 months in.  Physical recovery was much different this time around than with the C-section.  For the first 6 or so weeks I experienced terrible pelvic pain surrounding the pubic symphysis joint.  This was likely due to his positioning during birth, as his head got a little stuck on the way out).  Thankfully I have been able to recover on my own without any additional PT.  The key to this has been keeping my inner thigh muscles and other muscles attached to my pubic bone from getting too tight. I have been able to resume working out without any issues as well. However, this did not come without first doing weeks of deep pelvic floor breathing and exercises to reestablish those key connections with my core muscles. Recovering from birth, whether natural or c-section is no joke. There were definitely some moments I thought my body would never recover. I had to remind myself that, just as growing a child takes time and patience, recovering from birth takes just as long.

~~~~~~~~

Overall, my first home birth was a great experience and I am completely open to sharing more with anyone that may ask. I plan to try and keep you all updated as time continues but first….back to studying for an anatomy and physiology exam. See ya!

1 Corinthians 13:1 “If I speak in the tongues of men or of angels, but do not have love, I am only a resounding gong or a clanging cymbal. “

Filed Under: Baby, chronic lyme, chronic lyme disease, Gabriella's Updates, homebirth, Personal Experiences

Paleo Asian Sesame Beef (Keto & AIP-friendly)

January 30, 2021

I like easy recipes, and today’s post is one of them. This recipe can be thrown together in a matter of minutes. Not only that, it can be prepped early on and cooked at a later time. While not part of today’s recipe, the salad I also whipped up is also super easy. Simply slice up whatever vegetables you have on hand and toss with a little rice or apple cider vinegar plus a pinch of sea salt. For the meat, we had a bunch of steak in the bottom of our freezer waiting to be used. However, ground beef would work just as well (and make the recipe even quicker!). I don’t have much more to say than that other than if you’re a parent who works, is in school (or does anything else for that matter) this recipe is for you. Enjoy!

Ingredients

  • 2 lb flank steak
  • 1 cup coconut aminos
  • 4 garlic cloves
  • 1/4 cup sesame oil
  • 1/4 cup granulated monk fruit (or) coconut sugar
  • 1 tbsp sesame seeds
  • Scallion, sliced

Process

  • Mince garlic and place in a large mixing bowl, along with the aminos, sesame oil, sesame seeds, and sweetener of choice.
  • Slice flank across the grain into desired sized pieces and place in the bowl, allowing the meat to marinade anywhere from 2 hours to overnight.
  • Heat a medium sized pan over medium heat until hot.
  • Once hot, add beef and cook until tender and the sauce begins to thicken.
  • Slice scallion for garnish and serve.

Notes – If you follow the AIP, omit the sesame seeds and use tigernut oil in place of the sesame oil.

Ephesians 4:2 “Be completely humble and gentle; be patient, bearing with one another in love.”

Filed Under: AIP, autoimmune friendly, autoimmune paleo, beef, gluten free, low carb, meat, paleo, Protein Dishes, Recipes

Keto-friendly Hot Cocoa Brownies (Nut-free, coconut-free, low-carb)

January 5, 2021

There’s nothing much better than a good brownie. I like mine full of chocolate, fudgy, and moist (yes – moist). If you like a cakey brownie, you’ve come to the wrong place. While a fudgy brownie is truly plenty, I decided to make my brownies a little *extra* and add some different toppings and mix-ins. This was my first time baking with Dandie’s marshmallows thanks to a free gift through my Thrive Market order. Side note – I just have to say, having a Thrive Market membership truly is the best way to save money all the healthy brands out there (and you get free gifts!). But back to the brownies…While Dandie’s do have some sugar, I chose to make the rest of my brownies relatively low-carb. You can use all tigernut or almond flour, or use half and half. I chose to use granulated monk fruit but feel free to substitute granulated maple or coconut sugar as well. The butterscotch chips my mom and I found at our local Walmart, and they really do add a little something special to the flavor to the brownies (though not completely necessary). Enjoy and Happy 2021!

Keto-friendly Hot Cocoa Brownies

Ingredients

  • 1 cup Lily’s dark chocolate chips
  • 1/2 cup ghee
  • 1/2 tsp sea salt
  • 1 tsp vanilla extract
  • 1 cup tigernut (or) almond flour
  • 1/4 cup cocoa powder
  • 2/3 cup granulated monk fruit
  • 3 eggs
  • 1/4 cup Lily’s butterscotch chips

Topping

  • 1/2 cup Dandie’s mini marshmallows
  • 1/4 cup Lily’s dark chocolate chips 

Process

  • In a double broiler, melt chocolate chips, ghee, salt, and vanilla together until smooth.
  • Whisk together flour, cocoa, and sweetener until combined, then add in eggs and warm chocolate mixture, mixing together until smooth.
  • Fold in butterscotch chips then pour the batter into a 8×8 pan and finish with toppings, then bake at 350 for 20-25 minutes.
  • Remove from the oven and allow to fully cool before slicing and serving.

Isaiah 26:9 “My soul yearns for you in the night; in the morning my spirit longs for you.”

Filed Under: baked goods, coconut free, Dessert, ketogenic, low carb, paleo, Recipes, Sweets and Snacks, tigernut flour

Paleo Tigernut Flour Snickerdoodles (Nut-free, Coconut-free)

December 12, 2020

The past month has been nuts…For starters, we welcomed our baby boy Miki (John Miguel) into the world on the 19th of November. His “due” date was actually the 26th, and I was doing all I could to prepare for finals before he would arrive (more on that later).  It’s been a lot trying to adjust to having 2 under 2, as well as 2 older kiddos while trying to finish off my semester strong. But I’m happy to say all my final grades ended up being great and I am officially done with the Fall 20 semester! I’ve got one more come spring and I am *that* much closer to becoming a PA (but more on that later too). Today’s post isn’t about my professional career path or babies, though those are soon to come. Instead, today’s post is about snickerdoodles.  After doing all the studying my sleep deprived brain could handle this weekend, I decided to take get in the kitchen and focus on some Christmas baking. The result of this was these buttery snickerdoodles.  As always, while I used monk fruit as my sweetener, they can easily be made with coconut and maple sugar. Overall, these cookies are simple, delicious, and a perfect way to celebrate the Christmas season despite everything going on in the world around us.  

Tigernut Flour Snickerdoodles

Ingredients

  • 2 2/3 cup tigernut flour
  • 2 eggs
  • 1 1/2 cup ghee
  • 1 1/2 tsp cream of tartar
  • 1/2 tsp sea salt
  • 1/2 tsp baking soda
  • 3/4 cup granulated monk fruit
  • 1 tsp vanilla extract

Coating

  • 1/3 cup granulated monk fruit 
  • 2-3 tbsp cinnamon

Process

  • Cream together ghee and sweetener of choice.
  • Add in vanilla and eggs one at a time, beating just until the yolk is no longer visible.
  • Mix together dry ingredients and slowly beat into wet until just combined
  • Transfer the dough to plastic wrap and chill in the fridge for 30+ minutes.
  • Remove from the fridge and quickly roll into like-size balls, rolling in the cinnamon and sugar mixture before placing on a parchment lined baking sheet.
  • Bake the cookies for 10 minutes until just golden, then remove from the oven and allow to cool completely before serving. 

Galatians 4:4-5 “But when the set time had fully come, God sent his Son, born of a woman, born under the law, to redeem those under the law, that we might receive adoption to sonship.”

Filed Under: coconut free, cookies, grain free, nut free, paleo, Recipes, tigernut flour, tigernuts

Paleo AIP-friendly Tigernut Flour Apple Crisp (Nut-free, Coconut-free)

November 5, 2020

Fall desserts are probably my favorite. Maybe it is because I don’t make them all year long (as compared to cookies or ice cream), which causes them even more special when Autumn rolls around. Or maybe it is because for years I couldn’t even handle the tiniest dash of cinnamon (thanks to MCAD). Either way, Fall desserts are just special. So, since it suddenly went from being August to November (am I the only one who feels this way?), I decided it was time for a nice, cinnamon-y treat to warm everyone’s bones. If you love the idea of pumpkin pie, but are a bit intimidated by the though of making pie dough, this recipe is for you. There really are no hidden secrets or tricks, just simply mix, layer, bake, and you’re golden.

AIP Paleo Apple Crisp

Ingredients

  • 12 cups apples, peeled, cored, and diced 
  • 1 tbsp cinnamon
  • Juice of 1 lemon
  • 1/4 tsp sea salt
  • 1/3 cup maple sugar
  • 3 cups tigernut flour
  • 1/2 cup maple syrup
  • 1-3 tsp cinnamon
  • 1 cup non-hydrogenated palm shortening
  • 1 tsp vanilla
  • 1/4 tsp sea salt 
  • Coconut cream for whipping

Process

  • Peel, core, and dice apples then mix in a bowl with cinnamon, lemon juice, maple sugar, and sea salt then pour into a large baking dish.
  • In a clean mixing bowl, sift together tigernut flour, cinnamon, and sea salt, then mix in the maple syrup, vanilla, and palm shortening with a large fork.
  • Crumble the topping over the apple mixture and bake for 55 minutes at 325 degrees until the top is brown and crispy.
  • Remove from the oven and serve with whipped coconut cream sweetened as desired.

Ephesians 4:32 “Be kind and compassionate to one another, forgiving each other, just as in Christ God forgave you.”

Filed Under: AIP, autoimmune, autoimmune disease, autoimmune friendly, autoimmune paleo, baked goods, coconut free, dairy free, Dessert, gluten free, grain free, nut free, paleo, Recipes, tigernut flour, vegan

Keto-friendly Twix Candy Bars (Dairy-free, sugar-free, nut-free)

October 12, 2020

Today’s recipe started with a new batch of caramel I honestly wasn’t sure how to put to good use. While I would have loved to make a recipe utilizing apple, pumpkin, or something of the sort, taking a trip to the grocery store wasn’t exactly an option. So, sticking with what I had on hand I decided to make some copy-cat Twix bars. Oddly enough, the drier, cooler days lately have had me in a major Halloween candy mood. I say odd because, honestly, I never really desire candy. But chocolate candies are given me all the feels lately, which is where today’s recipe stems from. While I’ve managed to try a few different Twix copy-cats lately from bloggers I followed, I new making my own version was a must. For the keto caramel I chose to use stevia syrup, though granulated monk fruit may work just as well (just watch the cooking time so you don’t get stuck with a burnt mess!). I also used full fat coconut cream as I have two big jars sitting in the back of my fridge from my last trip to the Asian market. The cookie base I adapted from my chocolate-covered peppermint patty cookies (see here), and the topping is just some good ole Lily’s dark chocolate. As always, if you can handle natural sugars, feel free to use maple syrup or honey, and, since I’m all about a flexible recipe with multiple substitutions, feel free to use heavy. cream in place of the coconut, or even make your own chocolate topping with coconut oil and cocoa powder. Enjoy!

Keto-friendly Twix Candy Bars

Caramel

  • 12 oz coconut cream, full fat
  • 4 oz NuNaturals maple stevia syrup
  • 1/8th tsp sea salt
  • 1 tsp vanilla extract

Cookie

  • 1 cup coconut flour
  • 1/4 tsp baking soda
  • 1 egg
  • 1/2 cup non-hydrogenated palm shortening
  • 1 tsp vanilla extract
  • 1 oz NuNaturals maple stevia syrup

Topping

  • 10 oz Lily’s dark chocolate chips
  • 1 tbsp coconut cream, full fat

Process

  • Add all caramel ingredients but vanilla to a pot and heat over medium-high, boiling for 5 min then reducing to a simmer until golden, about 15-20 minutes, then stir in vanilla and allow to cool completely.
  • In a bowl, mix together cookie ingredients and press into a 8×8 inch square baking pan, baking at 350 for 15 minutes until golden around the edges. Remove from the oven and allow to cool fully.
  • Once the cookie base is cooled, spread cooled caramel over the top and place in the freezer to set.
  • While the caramel is setting, slowly melt chocolate chips and coconut cream over a double broiler until smooth, then spread evenly over the set cookie and caramel base.
  • Place the pan back in to the freezer to allow the bars to fully set then slice and enjoy.

Isaiah 55:6 “Seek the Lord while he may be found; call on him while he is near”

Filed Under: candy, coconut flour, Dessert, grain free, ketogenic, low carb, nut free, paleo, Recipes, Sweets and Snacks

Paleo Allergen Friendly Chocolate Chip Cookies (Keto, Nut-free, Coconut-free, Sugar-free)

September 29, 2020

A good chocolate chip cookie that fits within multiple allergy guidelines can be hard to come by. Sure, you can form dough into what looks like cookies, but do they really taste like a real cookie? That is always my biggest hangup on allergen-friendly cookies. Today’s recipe is one that comes with a variety of versions and substitutes. While it doesn’t necessarily fit into a single category such as Keto or AIP-friendly, I thought it would be good to share since the results of my combination of ingredients is absolutely fabulous. I get it though, not everyone desires or can eat “fake” sugar alternatives such as stevia syrup or monk fruit. Are they the most pure things in the world? Obviously not. However, these are the ingredients my body does best with at this time and maybe they are for you too (or not), which is why I’ve given a variety of alternatives to try. Overall, these cookies bake up absolutely perfect. There is no need to press them down, simply mix, scoop, and bake like regular cookies. For those of you on the low-carb, keto train, you may be wondering if the molasses is absolutely necessary, and my answer is YES! This tiny bit of sugar is to help replace what brown sugar would otherwise do in a traditional cookie made with a mix of white and brown sugar. I chose to use a mix of tigernut and almond flour because for starters, I’m not afraid of a little carbs here and there as long as my body can handle them and two, I find recipes made with all nuts are a little heavy on the stomach. That being said, as I mentioned previously there are many different ways you can make this recipe, all of which you can find below in the recipe’s notes. Enjoy!

Paleo Allergen Friendly Chocolate Chip Cookies

Ingredients

  • 1 1/2 cups tigernut flour
  • 1 1/2 cups tapioca flour 
  • 1/2 tsp baking soda
  • 1/2 tsp sea salt
  • 6 oz butter
  • 2 eggs
  • 1 tbsp molasses
  • 1/3 cup granulated monk fruit
  • 1/4 cup NuNaturals vanilla stevia syrup
  • 1 tsp vanilla extract 
  • 3/4 cup Lily’s chocolate chips

Process

  • In a stand mixer, whisk together butter, molasses, monk fruit, and stevia syrup until smooth, then beat in eggs one at a time and vanilla extract until just combined.
  • In a separate bowl whisk together dry ingredients then slowly add to the stand mixer until a smooth dough has formed.
  • Fold in chocolate chips and transfer dough to a parchment lined baking sheet with a cookie scoop, baking at 350 for 10-12 minutes.

Notes

  • For keto, replace tigernut flour for almond flour.
  • For nut-free, replace almond flour with arrowroot or tapioca starch.
  • For paleo, replace monk fruit with granulated maple sugar or coconut sugar and stevia syrup with maple syrup, honey, or coconut nectar.
  • For dairy-free, replace butter with non-hydrogenated palm shortening or ghee.
  • For an egg-free, AIP friendly chocolate chip cookie recipe click here.

John 3:20-21 “Everyone who does evil hates the light, and will not come into the light for fear that their deeds will be exposed. But whoever lives by the truth comes into the light, so that it may be seen plainly that what they have done has been done in the sight of God.”

Filed Under: baked goods, coconut free, dairy free, Dessert, gluten free, grain free, ketogenic, low carb, nut free, paleo, Recipes, tigernut flour

Keto Churro Cheesecake Bars (Grain-free, Nut-free Option)

September 11, 2020

Sad story, I’ve never actually had a real churro (real meaning glutinous). I grew up seeing them on TV and music videos (thanks, Avril Lavigne haha), but never actually got to experience one for myself thanks to my health plummeting from chronic Lyme. All that to say, while I never had a churro growing up, I did have my fair share of cinnamon sugar on toast. It was my mom’s special treat in the cold winter mornings and I definitely loved every bite. While toast isn’t necessarily a piece of fried dough, it certainly helped me guess just how amazing churros really are, hence today’s recipe… Cheesecake is another one of my childhood favorites, which is why I found it completely appropriate to combine the two and make a decadent churro cheesecake. Though it is still technically summer, this cheesecake is the perfect dessert to welcome Fall without diving into full-blown-pumpkin spice. I made the recipe using almond flour and all the full-fat dairy products in the filling. However, if these things do not work for your, I encourage you to try tigernut flour and an alternative cream cheese. As for the taste, this cheesecake got rave reviews from kids, adults, and babies alike (Allie kept exclaiming “mmmmm”). With a cinnamon-sugar topping and cinnamon shortbread cookie crust, it was described to be like a cheesecake-filled churro. What could be better?!

Keto Churro Cheesecake Bars

Crust

  • 2/3 cup almond flour
  • 1/3 cup coconut flour
  • 1 tsp baking powder
  • 1/4 tsp sea salt
  • 1 tbsp cinnamon
  • 4 oz butter, cold
  • 2 tbsp cold water

Filling

  • 3, 8 oz cream cheese blocks
  • 4 oz cultured sour cream
  • 4 eggs
  • 1/4 cup vanilla stevia syrup
  • 1/3 cup granulated monk fruit
  • 1 tbsp fresh squeezed orange juice
  • 1 tsp vanilla extract

Topping

  • 1 tbsp granulated monk fruit
  • 1 tsp cinnamon

Process

  • In a food processor, pulse together crust ingredients until a dough has formed, then press it into the bottom of a springform pan.
  • Par-bake the crust at 350. dg for 10 minutes, then remove from the oven and allow to cool while preparing the filling.
  • In a stand mixer, whisk together cream cheese and source cream until smooth, then add in monk fruit, stevia, vanilla, and orange juice until just combined.
  • Add in the eggs 1 at a time, mixing slowly just until you can no longer see the yellow of the yolk.
  • Pour the filling over the cooled crust and sprinkle with topping, swirling with a toothpick as desired, then place the cheesecake in a 325 dg preheated oven and bake for 60 minutes until just. set.
  • Remove the pan from the oven and allow the cheesecake to cool 4-6 hours or overnight before slicing and serving.

Notes

For a nut-free option, simply use tigernut flour in place of the almond flour. I purchase both of my flours and monk fruit sweetener from Thrive Market.

The filling can be made dairy-free using your favorite dairy-free, unsweetened cream cheese and sour cream or yogurt.

Psalm 143:10 “Teach me to do your will, for you are my God; may your good Spirit lead me on level ground.”

Filed Under: coconut flour, dairy free, Dessert, ketogenic, low carb, nut free, Recipes, Sweets and Snacks

My 2nd Pregnancy with Chronic Lyme

September 4, 2020

Twenty-eight weeks pregnant (again) with my second, and this time it’s a boy. With my first pregnancy I tried to keep ya’ll up to date on how I was feeling and how chronic Lyme was affecting my pregnancy on a regular basis. This time around I’ve been a little more laid back about my updates, though no purposefully. I think this is primarily due to things being somewhat similar to my previous experience being pregnant with Lyme. However, there are definitely some differences that I decided I definitely needed to share. I talk about all of these in my video (linked below), but let’s take a second to recap…For starters, the first thing I noticed early on in my pregnancy was my changes in reactions (allergies). With Allie I found my tolerance to food increased most drastically once into my 2nd trimester. However, this time around it seems my over-reactivity to foods quickly lowered early on in my 1st trimester. Another difference was that with Allie I had debilitating all-day-morning sickness into my 2nd trimester. With our little guy this time around I only had morning sickness for a couple weeks (the clue to me thinking to take a pregnancy test) and haven’t felt near as crappy as before. I’ve been able to continue working out and it seems to help me feel more human this time around as well. Overall, I believe there were a few things that helped contribute to feeling better this second time around, which I discuss briefly in my video. As always, please feel free to reach out if you have any questions! I feel blessed to be able to even write the title of this post and am always open to sharing the intricacies of my story to anyone interested.

Psalms 107:8-9 “Let them give thanks to the Lord for his unfailing love and his wonderful deeds for mankind, for he satisfies the thirsty and fills the hungry with good things.”

Filed Under: Baby, chronic illness, chronic lyme, chronic lyme disease, Gabriella's Updates

AIP Paleo Orange Creamsicle Ice Cream (Dairy-free, Low-carb friendly)

August 18, 2020

I love ice cream, I mean, who doesn’t? But orange creamsicle ice cream? Now that is just on a completely different level of “love.” I’m sure I’ve written about it somewhere on here, but anything “orange-cream” automatically takes me back to my childhood. I grew up going to Ocean City, NJ once a year for a long weekend to enjoy the sun and sand, and also, the boardwalk’s amazing orange creamiscle softserve. Of course, however, after having to drastically change my diet due to chronic Lyme and the ensuing gut issues and allergies, both oranges and cream were out of the picture. It’s been awhile since I’ve been able to handle any type of citrus (thanks to MCAD & Interstitial Cystitis), however, with being in my second pregnancy I’ve found I can tolerate certain things better than even with my first. Therefore, with a bag of 99 cent oranges and a can of coconut milk sitting in the back of my fridge, I decided to make my childhood memories come true. Overall, to get the most out of this recipe, I highly recommend you freshly squeeze your own orange juice. There’s just something about fresh juice compared to flat-tasting, boxed juice that does not compare. Secondly, use the lightest tasting sweetener you can get your hands on. Personally, I used NuNaturals vanilla stevia syrup because my body handles it well. And lastly, if you can handle dairy, go for the heavy cream (there’s nothing like a dairy-based ice cream in my opinion).

AIP Paleo Orange Creamsicle Ice Cream

Ingredients

  • 1 1/5 cups fresh squeezed orange juice
  • 1 1/4 cup pure coconut cream
  • 1/3 cup coconut nectar
  • Zest of 1 orange
  • 1 tbsp vanilla bean powder

Process

  • In a blender combine all ingredients until smooth, then pour into your ice cream maker and churn 15-25 minutes until thickened.

Notes

Use vanilla stevia syrup and heavy cream for low-carb/keto version. You can also sub honey if following the AIP.

2 Corinthians 10:17-18 “But, “Let the one who boasts boast in the Lord.” For it is not the one who commends himself who is approved, but the one whom the Lord commends.”

Filed Under: AIP, autoimmune disease, autoimmune friendly, autoimmune paleo, dairy free, Dessert, egg free, ice cream, ketogenic, low carb, nut free, Recipes

Instapot Brisket and Sweet Potatoes (AIP/Paleo)

August 8, 2020

Now that I have a few weeks between summer and fall semester, I’ve had more time to plan meals ahead of time. While brisket and sweet potatoes are typically seen as more of a fall-inspired dish, the convenience of this 1 pot meal was too great to pass up. That being said, am I the only one who hates to smell my food cooking? Thanks to a side porch and outdoor outlet, not only was the cleanup for this dish minimal, I didn’t have to hear, see, or smell my dinner cooking. To me, this is when food is the tastiest, as it is almost like someone else cooked for you (thank you, Instapot). While my favorite way to eat brisket is most certainly smoked, I was pleasantly surprised to rank this dish a close second. The sweet potatoes and onion cook down to a mash, while the brisket remains fatty and succulent. On the other hand, if you have the patience, I urge you to cook your brisket for 3 hours in place of 1.5 to allow the protein fibers to fully break down, resulting in amazing, shreddable meat. Is it the most pretty dish? Nope, but it sure is tasty. Enjoy!

Instapot Brisket and Sweet Potatoes

Serves 6

Ingredients

  • 4-5 lb fatty brisket
  • 2 large sweet potatoes, cut into chunks
  • 3 medium onions, sliced
  • Salt, pepper, garlic powder, onion powder
  • 2 cups beef broth
  • 1/3 cup sherry vinegar
  • 1 bundle of fresh thyme
  • Extra virgin olive oil

Process

  • Cut brisket into large chunks and liberally coat with salt, pepper, garlic, and onion powder.
  • Drizzle the bottom of the Instapot pot with olive oil, followed by the sweet potato chunks, sliced onions, and fresh thyme.
  • Lastly, place the brisket over the sweet potato and onion, pour in the beef broth and sherry vinegar.
  • Turn your Instapot on and set for 1 1/2 hours.
  • Once cooked, release the pressure and serve as desired.

Psalm 149:4 “For the Lord takes delight in his people; he crowns the humble with victory.”

Filed Under: AIP, autoimmune, autoimmune disease, autoimmune friendly, autoimmune paleo, Food, meat, paleo, Primal, Recipes, vegetables

Chocolate-covered Coconut Collagen Bars (Paleo, Keto, Low-carb)

July 26, 2020

It’s just been one of those weeks…I’m tired from cooking, my feet ache, its 92 and feels like 100+ outside, and real food just doesn’t appeal to me (atleast the stuff I have to cook). I love cooking, and I love nourishing myself with whole foods, but we all have our moments, right? Well, I was having one of those “moments” all week last week, which is where today’s recipe came from. These coconut bars are filling, not too sweet, crumbly like a shortbread cookie, and have just the right amount of chocolate to satisfy any craving. Personally, I used Lily’s milk chocolate chips, however, any dark chocolate would work great. You could also make your own chocolate coating using coconut oil, cocoa powder, and sweetener of choice if you don’t have any actual chocolate on hand. Overall, while I stored my bars in the freezer, they maintain their shape and texture equally well in the fridge. To be honest, there’s not much more to say about them except they’re great, and I’m happy to share them with ya’ll. Enjoy!

Chocolate-covered Coconut Collagen Bars

Ingredients

  • 1 cup toasted coconut butter, melted
  • 3/4 cup coconut flour
  • 1/2 cup collagen
  • 1/4 tsp sea salt
  • 1/4 cup vanilla stevia syrup
  • 2/3 cup Lily’s chocolate chips
  • 2 tbsp salted butter, melted

Process

  • In a large bowl or food processor mix together melted coconut butter, collagen, coconut flour, stevia syrup, and sea salt until a crumbly, wet dough forms.
  • Line a loaf pan with parchment paper and transfer the dough to the pan, pressing the dough equally across the bottom of the pan.
  • Place the pan in the freezer to set while preparing the chocolate.
  • In a double broiler, slowly heat chocolate chips and butter until fully melted and combined.
  • Spread the chocolate over the top of the set cookie dough, sprinkle with additional chocolate chips, and place in the fridge or freezer to fully set.

Psalm 31:19 “Many are the afflictions of the righteous, But the LORD delivers him out of them all.”

Filed Under: coconut flour, cookies, Dessert, egg free, gluten free, grain free, ketogenic, low carb, no bake, nut free, paleo, Primal, Recipes

AIP Mixed Berry Clafoutis (Paleo, Coconut-free)

July 4, 2020

I love summer, I love berries, and I love celebrating 4th of July. End of story, need I write anymore? But really, in all seriousness there is not much to explain about this recipe except for it came from my love for the latter three things mentioned above. If you’ve never heard of or ever had a clafoutis, think of it as a fancy custard, but a bit less pudding-like thanks to the added flour. While traditionally made from a base of eggs, cream, and flour, I transformed this delightful French dessert into an Autoimmune-Paleo Protocol classic using bananas and tigernut products. If tigernut milk is not sold near you and you can tolerate coconut, feel free to use full-fat coconut milk in place of it. For the berries, feel free to use any you have on hand, or substitute with cherries (my original plan but Kroger was out of them). Overall, this recipe is a true crowd-pleaser, getting a two thumbs up from the older kids who definitely *don’t* eat AIP. My hope is that you will be able to enjoy it with friends and family on a hot, 4th of July day. Enjoy!

AIP Mixed Berry Clafoutis

Ingredients

  • 1 cup raspberries
  • 1 cup blackberries
  • 2 small yellow bananas
  • 1 cup tigernut flour
  • 1 1/4 cup tigernut milk
  • 2 tbsp honey
  • 1 tsp vanilla
  • zest of 1 lemon
  • 1/8th tsp sea salt

Process

  • In a food processor, blend together bananas, tigernut milk, lemon zest, vanilla, sea salt, and honey, and tigernut flour.
  • Grease a flame-proof baking dish that is atleast 1 1/5 inches thick, then pour in half of the batter and place the dish over a stove burner.
  • Slowly heat the dish over the stove until the batter is bubbling and beginning to set.
  • Remove from the heat, add 1/2 of the berries, then pour in the remaining batter, topping with the rest of the berries.
  • Place the baking dish in a preheated 350 degree oven and allow to bake 45-50 minutes until the berries are bubbling and the filling is set and golden around the edges.
  • Remove the dish from the oven and allow to cool completely before serving.

Jeremiah 17:9-10 “The heart is deceitful above all things and beyond cure. Who can understand it? “I the Lord search the heart and examine the mind, to reward each person according to their conduct, according to what their deeds deserve.”

Filed Under: AIP, autoimmune friendly, autoimmune paleo, coconut free, dairy free, Dessert, nut free, Recipes, tigernut flour, tigernuts

Double Chocolate Chip Loaf Cake (Keto, Nut-free, Dairy-free)

June 14, 2020

Brownies? Nope. Traditional chocolate cake? Nope. Double chocolate chip loaf cake? Yes! This cake is moist (yes – I said it), dense, and full of dark-chocolatey goodness. It is not a cake for the faint of heart, and it will fully satisfy any chocolate cravings you may have. It’s decadent like brownies, but not rich like a traditional cake with frosting. If I were to summarize it, I’d say this chocolate loaf cake is the best of both worlds. What could be better? Like many of. my best recipes today’s was created during a late-night Saturday baking-sesh. It had been a long week of studying organic chemistry and with the kids asleep and my husband working late, I decided it was time to have some much needed alone time in the kitchen. Overall, it was certainly worth it. This cake isn’t too sweet and can be eaten at any time of day (yes, I’ll admit I ate it at breakfast). It’s also incredibly satisfying, and doesn’t leave you with a lingering sweet-tooth. In the end, it’s chocolate on chocolate. How could you go wrong? If you’re looking for a similar recipe sans the double chocolate action, be sure to try out my chocolate chip loaf bread.

Double Chocolate Chip Loaf Cake

Ingredients

  • 3/4 cup coconut flour
  • 1/4 cup cocoa powder
  • 1/2 tsp baking soda
  • 1/2 tsp sea salt
  • 5 eggs
  • 1 cup warm water
  • 1/2 cup granulated monk fruit
  • 1/3 cup avocado oil
  • Lily’s chocolate chips

Process

  • In a large bowl, whisk together dry ingredients, then gradually whisk in eggs, warm water, monk fruit, and avocado oil until a smooth batter has formed.
  • Pour the batter into a parchment lined loaf pan and place in a 350 degree preheated oven to bake for 50 minutes.
  • Once a toothpick comes out clean, remove the pan from the oven and allow the cake to cool completely in. the pan before slicing and serving.

Philippians 3:20 “But our citizenship is in heaven. And we eagerly await a Savior from there, the Lord Jesus Christ”

Filed Under: Cake, coconut flour, dairy free, Dessert, low carb, nut free, Recipes

Herbed Salmon Patties (AIP, Coconut-free)

June 2, 2020

I don’t have much to say about today’s recipe except for that it came out of the desire to not be in the kitchen. With 3 kids, an equally hungry husband, and my classes being online, I’ve spent my fair share in the kitchen the past couple months. While I enjoy the summer months where everyone’s home, I still usually have my little escapes to school and out and about for errands. However, as you many of you know, that definitely has not been happening for the majority of us. So, after a long day of studying I decided dinner needed to be simple and easy to clean up. These salmon cakes can be made into crab cakes, tuna cakes, or even sardine cakes. They can be baked (my preferred method – less clean up), or easily pan-fried in a skillet. While I used rosemary, thyme, and oregano, you can just as easily use fresh cilantro and parsley. If you don’t follow the AIP, simply use a large egg in place of the pureed plantain. Overall, the variations are quite endless, so enjoy!

Herbed Salmon Patties

Yields 5 Patties

Ingredients

  • 1, 8 oz can wild-caught salmon
  • Juice of 1 lemon
  • 1/2 tsp fresh oregano, rosemary, & thyme
  • 1 tsp sea salt
  • 1/4 cup minced scallion
  • 1/3 pureed green plantain (from 1 peeled plantain)

Process

  • In a food processor or bowl, mix together salmon, lemon juice, herbs, sea salt, and scallion.
  • Fold in pureed green plantain until combined, then form the mixture into 5 like-size patties.
  • Place the patties on a sheet pan and bake for 20-25 minutes in a 400 dg preheated oven until golden around the edges.

1 Thessalonians 4:17 “After that, we who are still alive and are left will be caught up together with them in the clouds to meet the Lord in the air. And so we will be with the Lord forever.”

Filed Under: AIP, autoimmune, autoimmune disease, autoimmune friendly, autoimmune paleo, coconut free, egg free, nut free, plantains, Protein Dishes, Recipes, seafood

Garlic Parsnip Flatbread (AIP, Paleo, Coconut-Free)

April 26, 2020

Parsnips are one of those vegetables that you either love or you loathe. While I’ve learned to love them over the years (mainly roasted with lots of sea salt to offset the natural sweetness), I know many others that are not in the same boat.  Nine times out of ten if I mention parsnips to a friend or relative, they stick their tongue out. Funny enough, even Allie, who will eat pretty much anything and everything (even smelly pureed salmon and broccoli), spits out parsnips every time I try and feed them to her.  Despite all of my attempts to hide them in purees with other veggies and meats, somehow she always can detect the parsnip.  Overall, while a parsnip-loving fellow is hard to come by, a flatbread loving individual is definitely not, which is why I chose to transform the  vegetable into something we all tend to love.  In the end, this recipe not only lends itself well to a variety of toppings, but is super simple to make.  Whether you choose to eat as is, topped with pesto and chicken, sausage and tomato sauce, or even just sprinkled with cheese and olive oil, I can guarantee you’re sure to love this parsnip flatbread.

Garlic Parsnip Flatbread

Ingredients

  • 2 large parsnips, peeled & cut into small chunks (13 oz cooked)
  • 1 tbsp minced garlic
  • 1 tsp kosher salt
  • 1 tbsp extra virgin olive oil
  • 2/3 cup tapioca flour

Process

  • Place parsnips into a small saucepot filled with water, boil until fork tender, then drain and place in food processing, pureeing until smooth. Add in salt, oil, flour, and garlic, pureeing again until a smooth, sticky dough forms.
  • Scoop parsnip dough onto a baking sheet lined with parchment, evenly spread it to 1/8th inch thick with back of a metal spoon dipped in cold water. Bake in a 350 dg preheated oven for 45-55 minutes until golden.
  •  Remove the baking sheet from the oven and allow the flatbread to cool before slicing into pieces. Drizzle with EVOO & top with desired toppings.  


Hebrews 7:25 “Therefore he is able to save completely those who come to God through him, because he always lives to intercede for them.”

Filed Under: AIP, autoimmune disease, autoimmune friendly, autoimmune paleo, coconut free, paleo, Recipes, vegetables, Vegetables and Sides

Raspberry lemon Muffins (Keto, Paleo, Nut-free)

April 11, 2020

While I planned on this time of quarantine to be one rich in recipe development and creativity, it seems all creativity has been stripped from me. To be honest, I’ve been in quite the food rut, and I will gladly blame having to cook 3 meals a day for upmost of 5 individuals every, dang, day. Don’t get me wrong, I love cooking, but when you have to spend the majority of your time in a kitchen cooking for other people, all desire and energy to make delicious food for yourself is gone. It’s just a fact. So, one night when everyone was finally in bed and I had a moment in the kitchen to myself, I decided to whip up a childhood favorite…muffins. If you’ve read some of my past posts about muffins you know that a good blueberry or raspberry muffin makes me super nostalgic. So, in a time full of stress and uncertainty you can be certain they are what I turned too. Overall, I couldn’t be more pleased with the results of today’s recipe, and the kids could not have been anymore jealous to find out that the muffins were, in fact, not for them (haha). With a slight crumb and just the right about of citrus, these raspberries are the perfect treat for breakfast or mid-afternoon snack to spice up the ground hog day that is April 2020. I hope you enjoy and stay safe my friends!

Raspberry Lemon Muffins (Keto, Paleo, Nut-free)

Ingredients

  • 1 cup coconut flour
  • 1/2 cup monk fruit, coconut, or maple sugar
  • 1/2 tsp sea salt
  • 1/2 tsp baking soda
  • 6 eggs
  • 1 cup warm water
  • 1/3 cup avocado oil
  • Juice of 1 lemon
  • Zest of 1 lemon
  • Zest of 1 clementine
  • 1 tsp vanilla
  • 2 cups fresh raspberries

Process

  • In a large bowl whisk together flour, sugar, sea salt, baking soda, and zest of one lemon and clementine.
  • In a separate bowl whisk together eggs, water, avocado, lemon juice, and vanilla.
  • Pour dry ingredients into the wet ingredients, mixing until a smooth batter has formed, then fold in raspberries until fully incorporated.
  • Transfer the batter to a greased and lined muffin or cupcake tin, then baked in a preheated 350 degree oven for 25-35 minutes until the muffin tops are just golden and a toothpick comes out clean.

1 Peter 2:24 ““He himself bore our sins” in his body on the cross, so that we might die to sins and live for righteousness; “by his wounds you have been healed.””

Filed Under: baked goods, Cake, coconut flour, ketogenic, nut free, paleo, Recipes, Sweets and Snacks

Paleo Autoimmune Protocol – Crispy Purple “Corn” Tortilla Tacos (Nut-free, Coconut-free, Nightshade-free)

March 19, 2020

It’s been awhile that I’ve been able to dedicate a few solid hours to recipe development. However, between it being Spring break and CoVid-19 quarantine (and thus seemingly endless hours to be at home), I knew it was time to think outside of the box and push my creativity. I’ll admit, over the past week I went to the grocery store about three times more than my normal once a week. Overall, with all of the hysteria surrounding possible lock-down, I wanted to make sure I was stocked up on food for at least the next 2 weeks (and thus avoid the Crazies for another 2 weeks). In one of my many grocery store hauls, I found organic purple sweet potatoes, something that is definitely not a normal occurrence. While I wasn’t exactly sure what I’d make of them (aside from a batch of chicken, carrot, cauliflower, and sweet potato puree for my little girl), I knew it just had to be something Autoimmune Protocol Paleo friendly. While I set out to make crispy chicken tostadas, unfortunately the dough would not stay super “snappy” for longer than 5 minutes, which is why I chose to simply call today’s recipe “crispy tortillas.” If there were ever an AIP-Paleo friendly tortilla that most closely resembled a real flour tortilla, these would be it. They’re crispy, slightly sweet yet savory with a bit of chew and strechiness, just like any true gluten-filled tortilla. They even puff up with air bubbles when cooking! Sorry, couldn’t contain my excitement. Anyways…All that to say, while I haven’t a “regular” tortilla in many years, my husband’s approval was enough to convince me that they truly are as good as I believe.

AIP Crispy Purple “Corn” Tortilla Tacos

Purple “Corn” Tortillas

  • 2.75 cup purple sweet potato puree (from 2 large purple sweet potatoes)
  • 2 cups arrowroot flour
  • Duck fat for frying
  • Shredded Beef, Chicken, or Pork
  • Sliced Radish

AIP Avocado Salsa Verde

  • 1 cup packed cilantro
  • 1/2 cup packed parsley
  • 3 garlic cloves
  • 1/4 cup red onion
  • 1/3 cup lime juice
  • 1/2 cup extra virgin olive oil
  • 1 large avocado
  • 1/2 tsp sea salt

Process

  • To make the puree, peel, dice, and boil sweet potato until fork tender, then blend in a food processor until paste has formed. Next, pulse in the arrowroot flour until a smooth dough comes together that is easily handled.
  • Remove the dough from the food processor and place on a piece of parchment paper, portion into golf-ball size balls and roll to 1/8th inch thickness.
  • Heat 1/2 inch duck fat in a large skillet over medium to medium-high heat, frying tortillas a few minutes on each side until they’re golden and puffy. Remove with a slotted spoon and allow to drain on a paper towel before serving.
  • Back in the food processor, pulse together cilantro, parsley, garlic, and red onion until chunky, then slowly pulse in lime juice, olive oil, and sea salt. Lastly, pulse in avocado until a chunky salsa has formed.
  • Assemble tacos with shredded meat of choice, salsa, and sliced radish. Enjoy!

Romans 15:4 “For everything that was written in the past was written to teach us, so that through the endurance taught in the Scriptures and the encouragement they provide we might have hope.”

Filed Under: AIP, autoimmune disease, autoimmune friendly, autoimmune paleo, coconut free, dairy free, grain free, meat, sweet potato flour, Vegetables and Sides

« Previous Page
Next Page »

Primary Sidebar

Recent Posts

My Guide to Practical Animal-based Eating

Paleo Banana Collagen Bars with Coconut Flour (Nut-free)

Paleo AIP Cinnamon Raisin Collagen Bars (Fruit-sweetened, Coconut-free)

Coconut Flour Molasses Spice Cookie Bites (AIP-friendly, Nut-free)

Crustless Keto Cheesecake (Carnivore-friendly)

Paleo Fruit Sweetened Harvest Bread (Gluten-free)

Copyright © 2025 · LBD Pro V on Genesis Framework · WordPress · Log in